

- What a new job does unless you change it
- Incremental by default, and when to choose otherwise
- The advanced options of a migration
- Test Migration: see the outcome before it happens
- The advanced options of a discovery
- Analyse everything Discovery finds in Power BI
What a new job does unless you change it
Section titled “What a new job does unless you change it”Every option has a default that is the right one for most jobs. Switch on Advanced Settings at the top of a step to see the options it hides; while it is off, the line under the switch names them, and it goes once they are on screen. A hidden option still applies: hiding it never changes what the job does.
| Option | Step | Default | Change it when |
|---|---|---|---|
Rules for adding and overwriting files | Destination, Advanced Settings | Add New Overwrite Existing By Newer: incremental | Files must never be replaced, or only refreshed, or everything copied again |
Include Subfolders | Source | On | Only the files at the top of the source are wanted |
Include empty folders | Source, Advanced Settings | On | The empty folders of the source are not worth recreating |
Include Version History | Source | On, with Version History Scope *:*:*: every version | The destination should hold fewer versions, for example 5:0:0 |
From Date, To Date, Size From, Size To, Source File Type | Source, Advanced Settings | Empty: every file | Only a slice of the source is wanted |
Migrate Files With Metadata Warnings | Source, Advanced Settings | Off | A file should arrive even when some of its metadata cannot |
Replace SharePoint Online source Document Library item with a .url link to Nextcloud | Source, Advanced Settings | Off | The Enhanced Migration: each migrated SharePoint Online file is replaced by a link to Nextcloud |
On a Job Import, the same options sit on its defaults steps and every job it creates is given them. See Import jobs
Incremental by default, and when to choose otherwise
Section titled “Incremental by default, and when to choose otherwise”A migration is incremental unless you choose otherwise. With the default rule, Add New Overwrite Existing By Newer, a run adds the files that are not yet at the destination, replaces those that are newer in the source, and leaves everything else alone. Run the same job again and it copies only what has changed since the last run — the way to keep Nextcloud close to the source during the project, and to make the final synchronisation before go-live short.
That is an incremental copy: each run still reads the whole source and checks every file against the destination to find what is new or newer. To have each run read — and check — only what changed since the last successful run, Discovery included, switch on Incremental (only files changed since the last successful run) under From Date: far fewer files to compare, and much faster runs. See Incremental runs: only the files changed since the last run
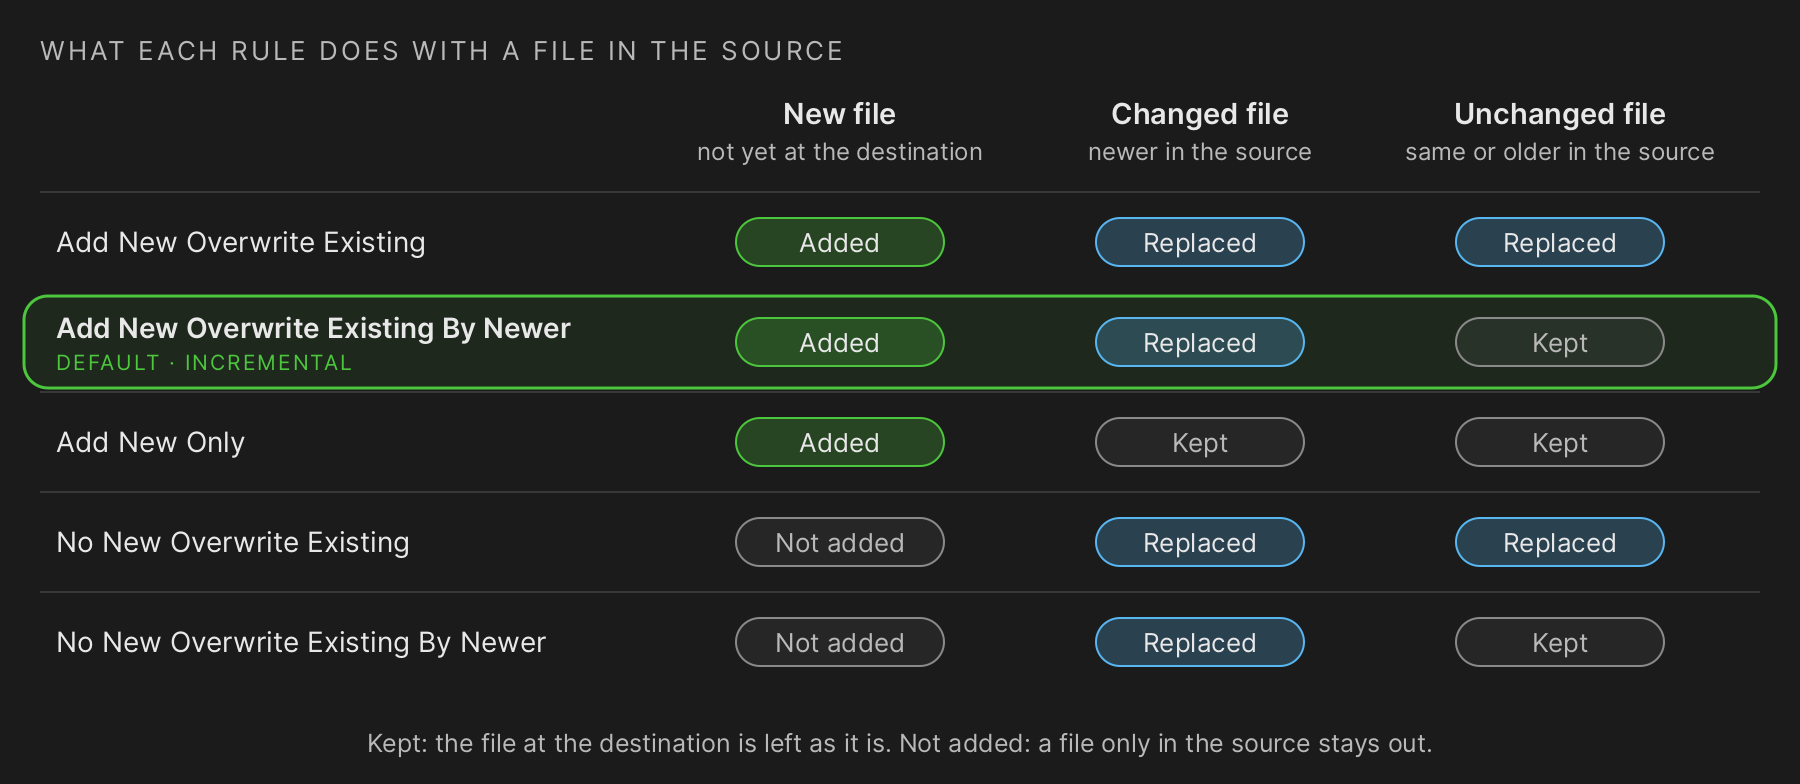
Diagram: what each rule does with a file in the source. Columns: new file (not yet at the destination), changed file (newer in the source), unchanged file (same or older in the source). Add New Overwrite Existing: Added, Replaced, Replaced. Add New Overwrite Existing By Newer (the default, incremental): Added, Replaced, Kept. Add New Only: Added, Kept, Kept. No New Overwrite Existing: Not added, Replaced, Replaced. No New Overwrite Existing By Newer: Not added, Replaced, Kept. Kept: the file at the destination is left as it is. Not added: a file only in the source stays out.
Keep in step — the default
Add New Overwrite Existing By Newer. New files arrive, changed files are refreshed, the rest is left alone.
Only create new files
Add New Only. New files arrive; a file already in Nextcloud is never touched, even when the source copy changed — so work done in Nextcloud is safe.
Refresh only what is there
No New Overwrite Existing By Newer, or No New Overwrite Existing to replace them whatever their date. Nothing new is added.
Copy everything again
Add New Overwrite Existing. Every file is written again. Changes made in Nextcloud are overwritten, so choose it deliberately.
The rule is set per job: a wave can keep the default while one library whose files people already edit in Nextcloud is set to Add New Only.
Read more: Rules for adding and overwriting files · Cutover: Traditional and Enhanced Migration
The advanced options of a migration
Section titled “The advanced options of a migration”A Migration or Test Migration job has every option above. The ones that most often change:
- A slice of the source.
From DateandTo Date,Size FromandSize Toin kilobytes, andSource File Typeas extensions —pdf;docx;xlsx. A file is taken when it passes every filter that is set, so two jobs with complementary date ranges split one library in two. - Subfolders and empty folders.
Include Subfoldersoff takes only the top folder;Include empty foldersoff leaves out the folders with no files in them. - Fewer versions.
Version History Scopesuch as5:0:0keeps five major versions and no minor ones — a smaller copy and a faster run. A file share keeps no versions. - Metadata warnings. Left off, a file whose metadata cannot be carried into MetaVox is reported and not written; on, it is migrated without that metadata.
- .url links. Replaces each migrated SharePoint Online file with a link to its Nextcloud copy, freeing the SharePoint storage. It writes back to the source and asks for confirmation first.
- Restore. On the Action step: turns the job around, so its runs copy the files changed and created in Nextcloud back to the SharePoint Online library or file share — filling .url links again. In a Test Migration it only reports what would change. See Restore: files back from Nextcloud to SharePoint Online or a file share
To see what these options will do before anything is written, run the job as a Test Migration first — see the next section.
Read more: Choose which files a job takes · Version history · Metadata, MetaVox and SharePoint views
Test Migration: see the outcome before it happens
Section titled “Test Migration: see the outcome before it happens”A Test Migration runs a migration job without writing a file. Its purpose is to test the outcome: which files the migration would add as new and which it would overwrite under the job's Rules for adding and overwriting files — by default Add New Overwrite Existing By Newer, the incremental rule — and that the source, the destination, the filters and the metadata work as set.
What a Test Migration leaves in the Power BI report
Each file it handles gets the File status Test Migration, with the destination it was tried against — a file no Discovery has found gets its row then. Nothing is moved: to see files arrive in Nextcloud, run a Migration, which turns them to Migration. See Follow every file from discovery to migration.
Use it where the outcome matters before it happens: a second run into a destination that already holds files, a change of rule, or a destination people already work in. Then switch the job to Migration — nothing else to change.
Read more: Rules for adding and overwriting files · Jobs and job modes
The advanced options of a discovery
Section titled “The advanced options of a discovery”A Discovery job writes nowhere, so it has no destination, no rules for adding and overwriting files and no empty folders. The source filters work exactly as for a migration and decide what the discovery reads:
| You want to see | Set on the Discovery job |
|---|---|
| The whole source | Nothing: the default reads every file, version and subfolder |
| Only what changed in the last two years | From Date: two years back |
| What would stay behind with a 2 GB limit | Size From: 2097152 |
| Only the Office documents and PDFs | Source File Type: docx;xlsx;pptx;pdf |
| One folder, without what lies below it | That folder in the source's address, and Include Subfolders off |
A first discovery is usually best left unfiltered: the Power BI report then shows the whole source, and every slice of it can be filtered there afterwards. Filter a Discovery job when you want a run of its own for one slice, or run the same job again later with the same settings to see how the source changes. Each run keeps its own Run History row and report.
Read more: Discovery · Choose which files a job takes
Analyse everything Discovery finds in Power BI
Section titled “Analyse everything Discovery finds in Power BI”The deepest analysis does not happen in the job dialog but in the Power BI report. Discovery records every file it reads into the reporting database, with all the SharePoint metadata it carries — and the report puts it on one screen to filter and compare across every library of the tenant.
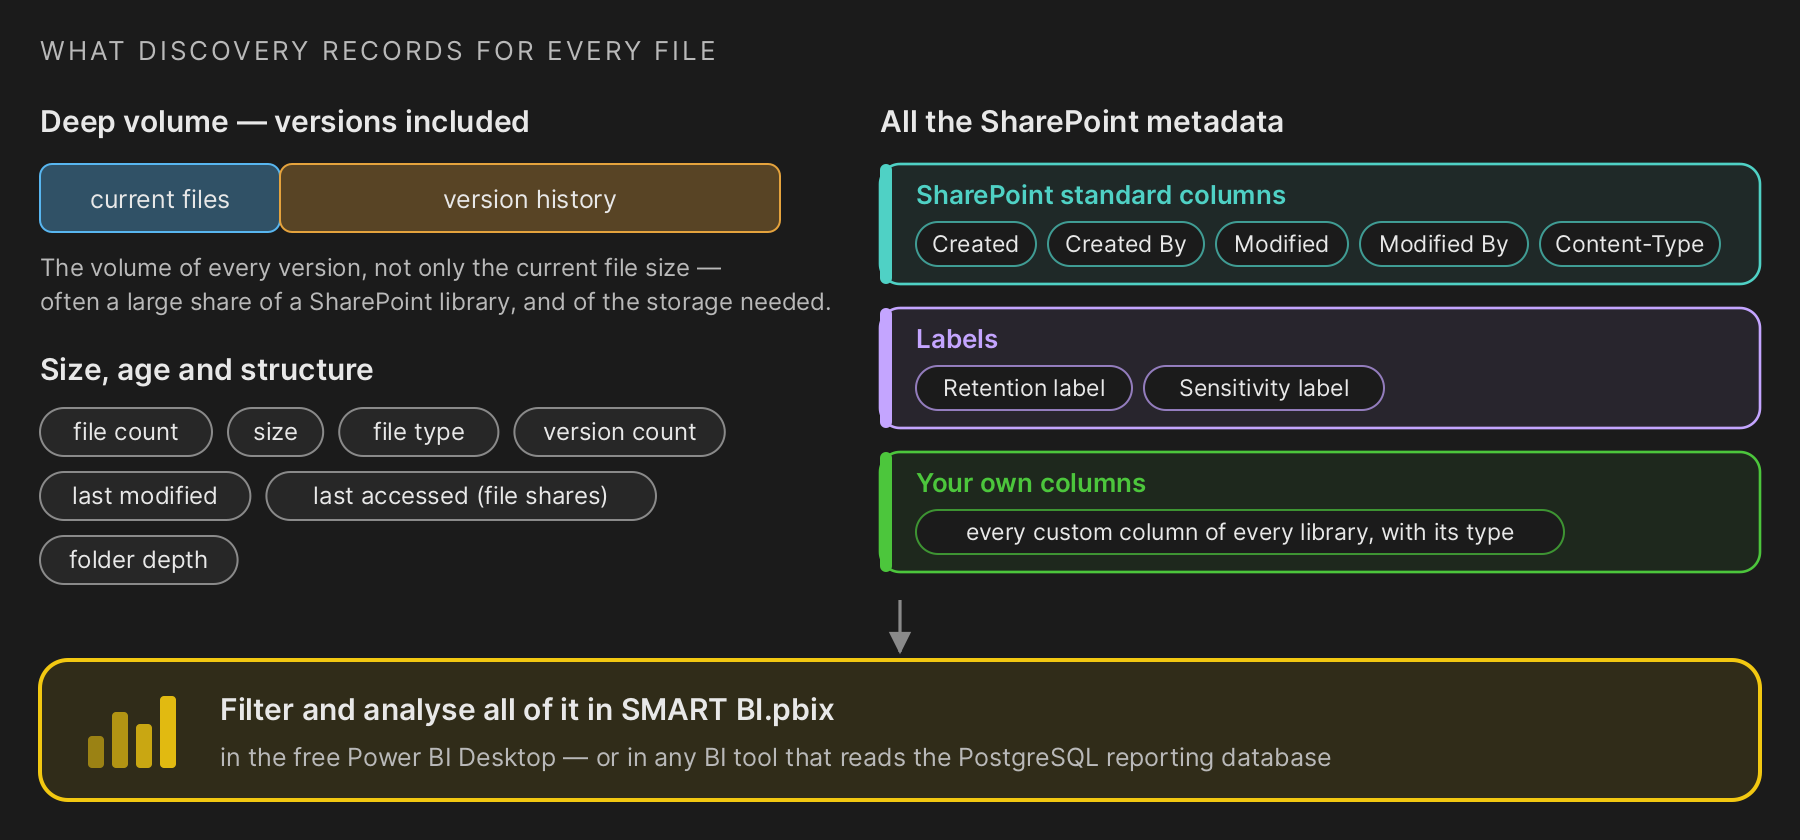
Diagram: what Discovery records for every file. Deep volume — versions included: current files and version history; the volume of every version, not only the current file size — often a large share of a SharePoint library, and of the storage needed. Size, age and structure: file count, size, file type, version count, last modified, last accessed (file shares), folder depth. All the SharePoint metadata: SharePoint standard columns (Created, Created By, Modified, Modified By, Content-Type), labels (Retention label, Sensitivity label), your own columns (every custom column of every library, with its type). Filter and analyse all of it in SMART BI.pbix, in the free Power BI Desktop — or in any BI tool that reads the PostgreSQL reporting database.
All the metadata, every version, for free
- All the SharePoint metadata: the standard columns — Created, Created By, Modified, Modified By and Content-Type — the retention and sensitivity labels, and every custom column of every library, with its type.
- Deep volume: the size of every version, not only of the current file. Version history is often a large share of a SharePoint library, and of the storage Nextcloud will need.
- Free to use:
SMART BI.pbixopens in Power BI Desktop, which costs nothing. Any other BI tool can read the PostgreSQL reporting database instead.
Ask the report what the migration plan needs to know: which libraries carry a sensitivity label, which content types are in use, which custom columns hold values worth carrying into MetaVox, how much of the volume is version history, and how much nobody has opened in years. Then set the filters, the version scope and the metadata options of the migration jobs on those facts.
Read more: Business intelligence with Power BI · A tour of the SMART BI report · Estimate volume and duration
See also