

SMART Migration signs in to Microsoft 365 as an app registration in Microsoft Entra ID, with a certificate instead of a password. You create the certificate, the app registration and its permissions, then enter the IDs in the M365 connection.
The work has four steps:
- Create a self-signed certificate: it proves the app’s identity to Microsoft 365.
- Create the app registration: the identity SMART Migration runs as.
- Grant the permissions: what the app registration may read and write.
- Enter the details in SMART Migration: the M365 connection.
Step 1 — Create a self-signed certificate
Section titled “Step 1 — Create a self-signed certificate”The script creates two files: a .pfx file with the private key, which stays with SMART Migration and is kept secret, and a .cer file with the public key, which you upload to Azure.
- Open PowerShell ISE or Visual Studio Code as Administrator.
- Paste the script below.
- Replace
c:\dev\MyCert.pfxandc:\dev\MyCert.cerwith the paths you want, andMyPasswordwith a password of your own. - Run the script.
# Create the certificate$mycert = New-SelfSignedCertificate -DnsName "MyDomain.com" -CertStoreLocation "cert:\LocalMachine\My" -NotAfter (Get-Date).AddYears(5) -KeySpec KeyExchange -KeyFriendlyName MyKeyName -FriendlyName MyFriendlyName# Export private key to .pfx (keep this secret)$mycert | Export-PfxCertificate -FilePath c:\dev\MyCert.pfx -Password $(ConvertTo-SecureString -String "MyPassword" -AsPlainText -Force)# Export public key to .cer (this gets uploaded to Azure)$mycert | Export-Certificate -FilePath c:\dev\MyCert.cerThe certificate is valid for five years (-NotAfter).
The names in the script are labels
MyDomain.com can be any identifier; it does not have to be a real domain. MyKeyName and MyFriendlyName name the certificate in the Windows certificate store. Change them or leave them as they are.
Installing the certificate on the computer is optional and not needed for the connection: Install the certificate on the computer
Step 2 — Create the app registration
Section titled “Step 2 — Create the app registration”- In the Azure portal, open Microsoft Entra ID (formerly Azure Active Directory).
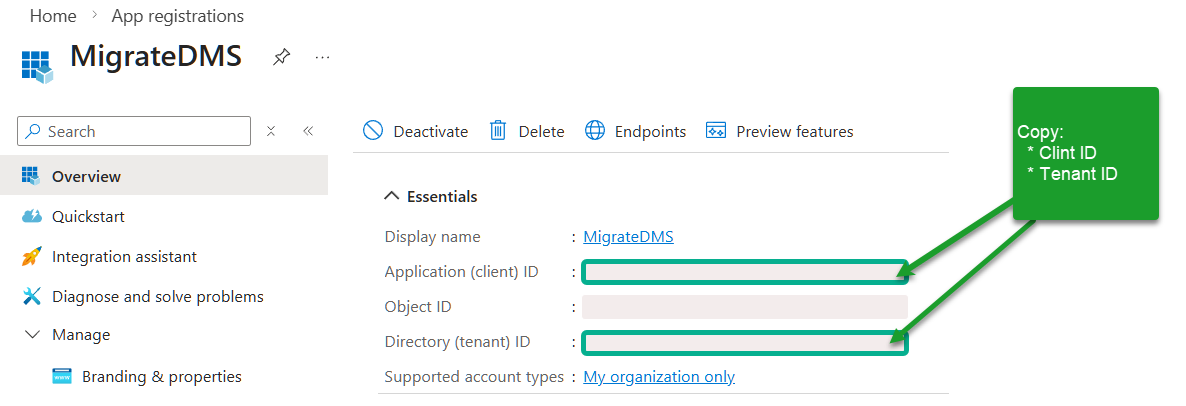
- Copy the Tenant ID from the overview page and keep it: the connection needs it.
- Click App registrations, then New registration. The default settings are fine.
- In the new app registration, open Certificates & secrets, click Upload certificate, choose the
.cerfile and click Add. - Copy the Application (client) ID and keep it as well.
Step 3 — Grant the permissions
Section titled “Step 3 — Grant the permissions”The permissions decide what the app registration may read and write. An administrator then grants consent for the whole organisation.
- Click API permissions, then Add a permission.
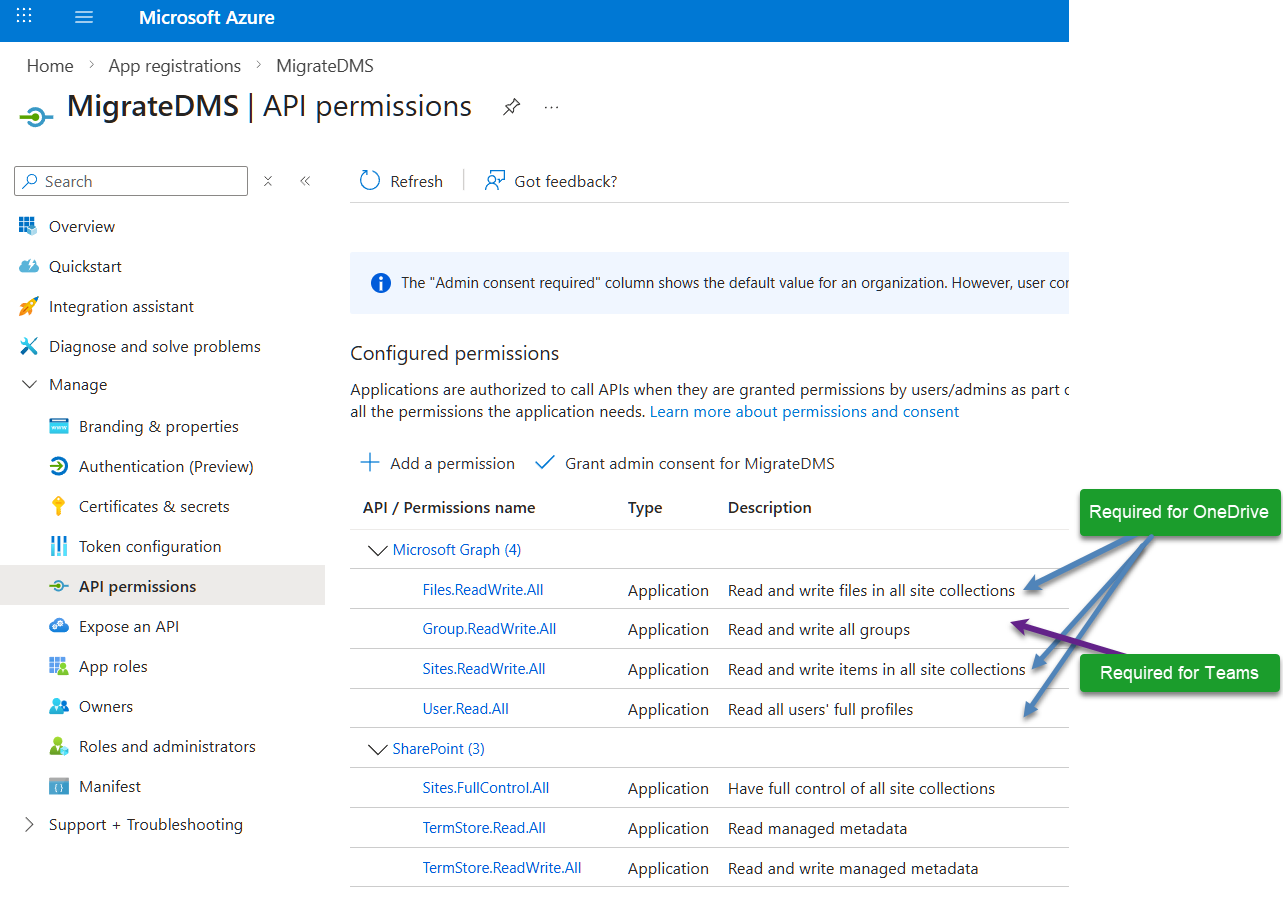
- Add the SharePoint and Microsoft Graph permissions in the tables below, each as an Application permission.
- Click Grant admin consent for (followed by your organisation’s name). Only then do the permissions take effect.
Microsoft Graph
Section titled “Microsoft Graph”| Permission | Type | Used for | Why |
|---|---|---|---|
Files.ReadWrite.All | Application | OneDrive | Read and write files in all site collections |
Group.ReadWrite.All | Application | OneDrive and Teams | Read and write all groups: Teams provisioning |
Sites.ReadWrite.All | Application | Teams | Read and write items in all site collections |
User.Read.All | Application | Both | Read full user profiles: user and OneDrive discovery |
SharePoint
Section titled “SharePoint”| Permission | Type | Why |
|---|---|---|
Sites.FullControl.All | Application | Full control of all site collections: needed for migration |
TermStore.Read.All | Application | Read managed metadata: keeps metadata during migration |
TermStore.ReadWrite.All | Application | Read and write managed metadata: when metadata is migrated or transformed |
Fewer permissions without Content Governance
When you do not use Content Governance (the SMART Migration App for MS Teams), the Microsoft Graph permissions can be reduced to Files.Read.All only. That is enough for file access, files larger than 2 GB included. The SharePoint permissions stay the same.
Step 4 — Enter the details in SMART Migration
Section titled “Step 4 — Enter the details in SMART Migration”- Open your M365 connection in SMART Migration.
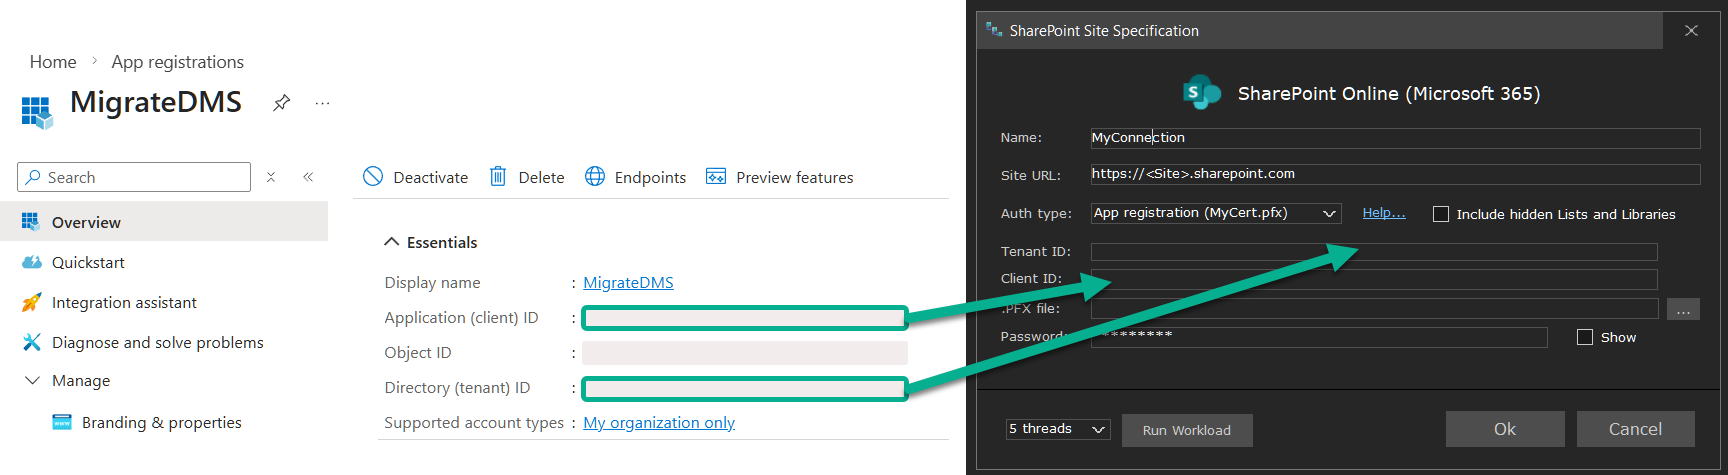
- Enter the Application (client) ID and the Tenant ID from step 2.
- Enter the path to the
.pfxfile and its password.
More than one tenant
Section titled “More than one tenant”A commercial licence is installed on one server, but is not tied to a tenant or a customer: that one installation can work with as many Microsoft 365 tenants as you need (Where a licence can run). A partner licence works only with the partner's own tenant and domains. Give each tenant an app registration of its own — steps 1 to 3 in that tenant — and its own M365 connection in SMART Migration (step 4).
- With the Nextcloud app, a job reads from each tenant through that tenant's connection; the destination is always Nextcloud.
- In the IDE, within one tenant, a job reads and writes through the same connection.
- In the IDE, between two tenants, a job reads through the source tenant's connection and writes through the target tenant's.
Read more: FAQ: Can we install SMART Migration on our own servers and connect to a customer's SharePoint?
Limit access to selected sites
Section titled “Limit access to selected sites”By default, the permissions above give access to all SharePoint sites. To limit the app registration to the sites you assign it to, for example in a production environment, use Sites.Selected instead of Sites.FullControl.All and Sites.ReadWrite.All.
Read more: Sites.Selected permissions: what it is and how to use it
Microsoft Graph permissions by task
Section titled “Microsoft Graph permissions by task”Add only what you need:
| Permission | When you need it |
|---|---|
Files.Read.All | Access to files larger than 2 GB |
Sites.Read.All | Discovery of SharePoint sites |
User.Read.All | Discovery of users and OneDrive locations |
Group.ReadWrite.All | Teams provisioning for Content Governance |
Sites.Selected | Access to selected sites only |
Read user information from Microsoft Entra ID
Section titled “Read user information from Microsoft Entra ID”SMART Migration reads Microsoft 365 user data, such as display name, department and OneDrive URL, through the virtual list Tenant users. It needs one of these Microsoft Graph permissions, depending on the fields you use:
User.Read.All: the full user profile.User.ReadBasic.All: basic fields only (name, e-mail, photo).
How you filter the list decides the speed:
=andINfilter on the server: fast, and the choice for tenants with more than 3,000 users.BeginsWithandContainsfilter in SMART Migration after reading: slower on large tenants.
App-only access must be allowed
With app-only authentication, SharePoint Online must allow app-only access to Microsoft Graph. This is set in the SharePoint admin center.
Consent error: The user or administrator has not consented to use the application with ID …